Why Consider a Jump Seat?
If you own a 1999 - 2007 Ford F250, F350, or F450 Super Duty, you may be considering adding a jump seat to your front row. A jump seat is a folding center seat that can accommodate a third passenger or provide additional storage space. While this installation isn't a direct swap, this guide will walk you through the process of replacing your console with a jump seat. For more information about these specific vehicles, you can visit the Ford Super Duty Wiki.
Step 1: Finding the Right Seat
When you're looking for a jump seat, it's essential to pick one that is compatible with your truck model. The 1999 - 2002 style had a coin holder with a large storage compartment, while the 2003 - 2007 style featured two cup holders and a smaller storage compartment. The colors offered also varied by year. If you're looking for available options, you can see our available jump seats at the links below.
Step 2: Remove the Console and Armrests
Before installing the jump seat, you will need to remove the existing console and armrests. Here's how to do it:
- Adjust the seats as far back as possible and remove the front bolts attaching the seats to the floor.
- Adjust the seats as far forward as possible and remove the plastic caps and rear bolts attaching the seats to the floor.
- Disconnect any electrical connectors from the console.
- Lift the seats and console out of the truck and set them aside.
- Slide off the armrest covers from both seats and remove the T45 Star Bit Bolts beneath.
- Remove the armrests from both seats and set them aside.
Step 3: Carpet/Floor Liner Modifications
The next step involves modifying the carpet and floor to accept the new jump seat:
- Place the jump seat in the vehicle and align the two front mounting holes.
- Mark the location of the rear mounting holes.
- Remove the jump seat.
- Cut an X over each marked hole using a razor knife.
- Remove the triangular tabs from the cutouts.
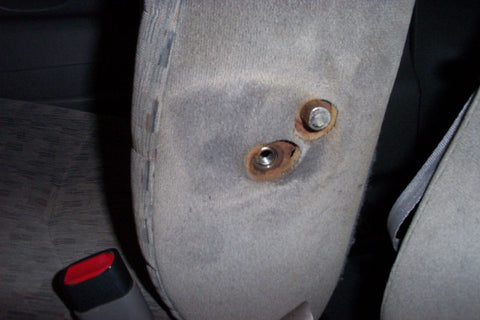
Step 4: Bucket Seat Modifications
Now that your vehicle is ready to accommodate the jump seat, you will need to modify your existing bucket seats:
- Pull off the cover for the armrest.
- Unbolt the armrest using a T45 Torx socket.
- Grind down the alignment pin that may conflict with the center jump seat. A hole will remain in the upholstery, which should be addressed by an upholsterer.
Step 5: Install the Jump Seat
Finally, it's time to install your new jump seat. Follow these steps for a successful installation:
- Place the jump seat in the vehicle and align the mounting holes.
- Tighten the bolts on the rear holes of the jump seat.
- Reinstall the driver and passenger seats in the vehicle. They will share a front mounting point with the jump seat.
- Test the jump seat by folding it up and down and securing the seat belt.
Conclusion
Installing a jump seat in your Ford Super Duty truck enhances your vehicle's functionality, offering either extra seating or additional storage space. If you have any more questions or need further assistance, feel free to contact us or refer to our FAQ section.
For the 2011-2016 Ford Super Duty please see this Jump Seat and Console Swap.