If your Ford Super Duty truck seats are worn out or uncomfortable, a seat replacement might be just what you need. Finding original '99 - '10 Super Duty Seats can be near impossible, so updating to the newer model year seats can change your simple replacement into a major upgrade! In this tutorial, we’ll walk you through the process of replacing a 40/20/40 seat from a 2005 Ford Super Duty with a newer model. Most seats from 1999 to 2016 models are interchangeable with minor modifications.
Tools and Parts You'll Need
Before diving into the replacement, gather the following tools and parts:
- Ford Super Duty Seat (1999-2010)
- Cordless Driver/Drill
- 18mm Socket
- T60 Torx Bit
- Phillips #2 Screwdriver
Seat Removal
Step 1: Prepping the Old Seat
Start by preparing your current bench seat for removal. You'll need an 18mm socket, preferably a deep-wall version, and a T60 Torx Bit with a ratchet or impact wrench. You will probably need to break the bolts loose by hand before using powertools.
Step 2: Unbolt Front Seat Track Bolts
Push the seat back as far as possible. Use an 18mm deep-wall socket to unscrew the front bolts that secure the seat to the floor. Some models may use a T55 or T60 bit.
Step 3: Remove Rear Bolts & Studs
Shift the seat to its forward-most position. Locate the stud caps and remove them with a screwdriver. Use an 18mm, T55, and T60 to unscrew the bolts and remove the nuts from the studs.
Step 4: Detach Seatbelt Receivers
Utilizing the T55 or T60 Torx bit, unfasten the bolts that attach the seatbelt receivers to the floor.
Step 5: Disconnect Seat Belt Receiver
Disconnect the seat belt receiver from the vehicle's seat belt buzzer plug, located just under the seat.
Step 6: Lift Out the Seat
With all bolts and receivers disconnected, you can now remove the old seat from the truck. If you have a bench seat, you may need assistance.
Seat Installation
Step 7: Prep the Floor
Identify the holes near the transmission tunnel. Make an X-shaped cut over each hole to expose it.
Step 8: Position the New Seat
Place the new jump seat on the transmission tunnel. Align the rear holes with existing holes where the seat belts were previously attached.
Step 9: Drill Additional Holes
Mark and carefully drill two holes in the transmission tunnel. Double-check that you won’t be damaging any underlying systems.
Step 10: Align the Jump Seat
Place washers or spacers between the floor and the jump seat frame to align it with the bucket seats.
Step 11: Install Bucket Seats
Put the new seats in place and secure them using the bolts removed from the old seats.
Step 12: Seat Belt Receiver
If the new seat belt receiver doesn't match the vehicle plug, reattach your old seat belt receiver using a T60 Torx bit.
Step 13: Final Tightening
Ensure that all bolts are securely tightened for your safety.
Congratulations, your Ford Super Duty now has a refreshed and comfortable set of seats!
For more details on custom seat builds, visit our Custom Seat Builds page.
Credit: The Super Duty Seat Swap Guide by JodyNoles
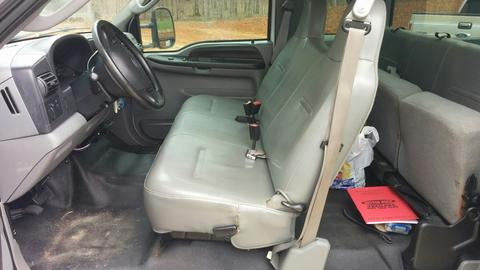
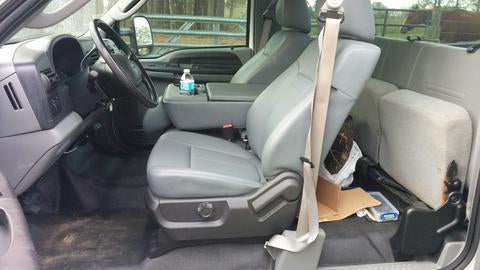
Before & After